Windows 10 Thumbnails Do Not Open When Making a Selection for Uploading a File

In this piece, nosotros're going to embrace the whole issue of thumbnail feature including,
- Why is your windows preview pane not working? (Thumbnail characteristic)
- What are the causes behind it?
- Why do we need film thumbnails?
- How tin can nosotros solve it in different ways?
So that you can understand why it ever disappears and how you can foreclose and solve it if anything goes wrong in the hereafter.
- Role one: What'south the Picture Thumbnail Feature
- Function two: Check Picture Condition to Fix Thumbnails Non Showing In Windows 10
- Office 3: Enable Thumbnails to Fix Thumbnails Not Displaying in Windows 10
- Role 4: How to Foreclose Windows x Images Corruption or Loss
Part i. What's the Picture Thumbnail Feature
With the advent of the digital platform, the visual search engines came into existence which uses the reduced size of pictures and videos that helps in recognizing and organizing them. This information-load reducing mechanism is known as the Thumbnail feature. This is also used past modern operating systems or desktops environments, such as Microsoft Windows, macOS, and what not?
A thumbnail is a compressed preview epitome of the original one, which is used every bit a placeholder. Depending upon the platform the epitome thumbnail carries a certain size. However, there is non whatsoever definite definition of thumbnails' size.
Why You Need Picture Thumbnails
The biggest advantage of thumbnails is their reduced file size as compared to the original one. The small size of the thumbnail feature enables the sites' loading faster. Considering it allows the company to have a lot of content immediately without increasing the loading time of any folio.
Farther advantages,
- Space savers: Yous can present an overview of large and dissimilar media in a small space by using the thumbnail characteristic.
- User-friendliness: The pollex structures brand users easy to find annihilation on the site. Especially, if the directions are presented in the form of images. Considering images can be captured very easily.
- Interactivity: Thumbnails increase the date factors for site visitors. It is because a pic tells a thousand words.
Also, y'all can see the use of thumbnails on the various prominent digital platforms like YouTube, Google, Pinterest, and Amazon.
Volition Thumbnails Get Corrupted or Deleted
As we've mentioned in a higher place, thumbnails are nothing but small versions of original images. In instance anything goes incorrect with your original photos. For sure your thumbnail feature won't work and can generate bug for other image folders. Hence, we should always take care of a few things while working with images like don't plow it off direct from the main socket, update it regularly, install antivirus, etc. To ensure that original images won't get corrupted, which tin touch the functioning of Thumbnail features.
If still, annihilation goes incorrect, don't get panic, you lot can always recover your data by using the Recoverit application. We're going to discuss this in our adjacent section. Let'southward jump into it.
Role two: Check Picture Condition to Gear up Thumbnails Non Showing In Windows 10
Before knowing how to recover your images, we must know why it is happening specially with Windows 10 only.
When the Windows 10 update was launched in October 2018, it was a total blunder. Not only files were getting deleted on it, but the task manager was likewise having 100 CPU usage. Subsequently on, Microsoft'due south manager of plan management for Windows servicing and delivery, John Cable admitted the issue past writing a blog.
If you're nevertheless using the same version so you may too have faced the same result. Don't worry we are here to give you a solution regarding picture thumbnails not showing windows 10.
Hither y'all go with the first 1,
Recover and Preview Deleted Pictures with Recoverit
We never wanted you to waste your precious time, that's why we've got you Recoverit Data Recovery software, which is a revolutionary solution to recover permanently deleted photos and files from all the latest versions of Windows computers. Whether information technology is about your and then much delicate windows drive-C or an external USB drive, it gives a ane-click solution to get your important data back.
To know how to utilize Recoverit software, you need to become through from following steps,
First, you need to download Recoverit photo recovery software on your, and then merely you can follow the below-given steps to restore your images or photos.
Step 1. Launch the Recoverit application and select a location to get started.

Stride-two: Now, Recoverit photo recovery software will begin its scanning procedure and accept a few seconds to search your lost photos.

Stride-3: Later the scanning process you will accept a list of lost photos that you can recover. Select the 1 that you want to recover. Cull a path where you want to save information technology and so hitting the 'Recover Button'

Now, check your files on your called path and enjoy it using equally yous want.
It'south fourth dimension to move on to the 2d method because knowing more ways to do i thing is proficient for your knowledge.
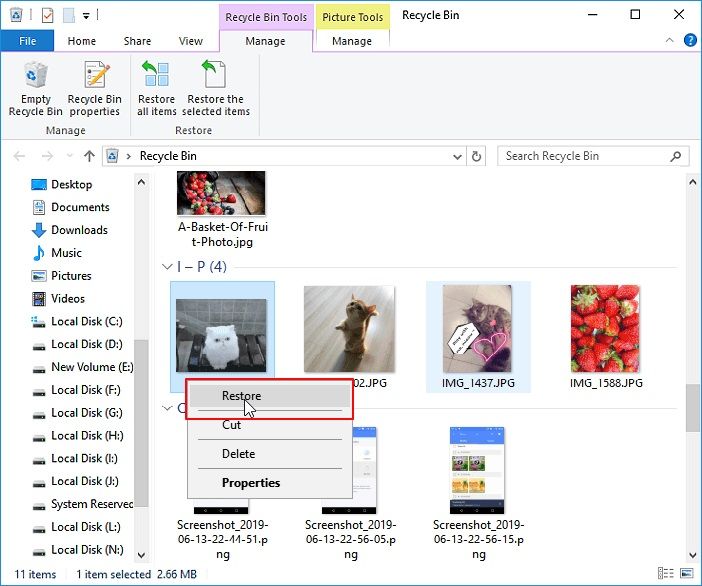
Restore and View Pictures from Windows ten Recycle Bin
Applies to undelete photos from Windows 10 Desktop, Windows internal hard drive, and partitions.
Stride one: Double-click on the Recycle Bin icon on Windows 10 Desktop.
Stride ii: Locate and right-click on the deleted photos, select "Restore".
Footstep 3: The deleted photos will exist restored from Recycle Bin to its original locations.
Part 3. Enable Thumbnails to Fix Thumbnails Not Displaying in Windows 10
Enable Thumbnails in the Folder Settings
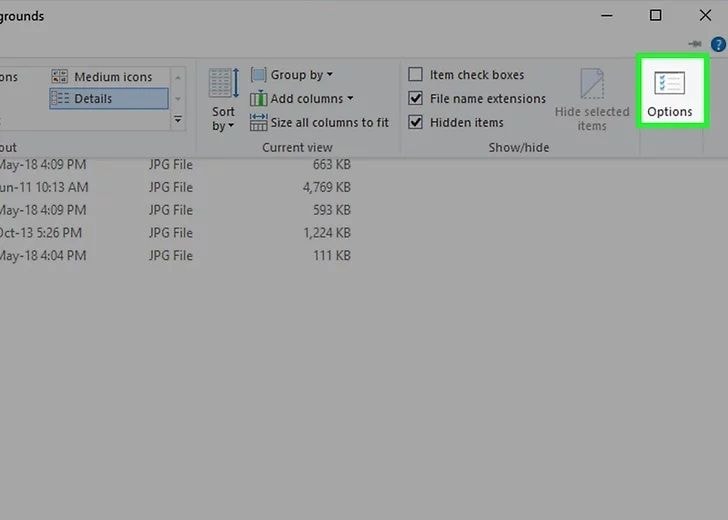
Step-one: Click on the file menu and choose options. Information technology will open the folder options dialog box.
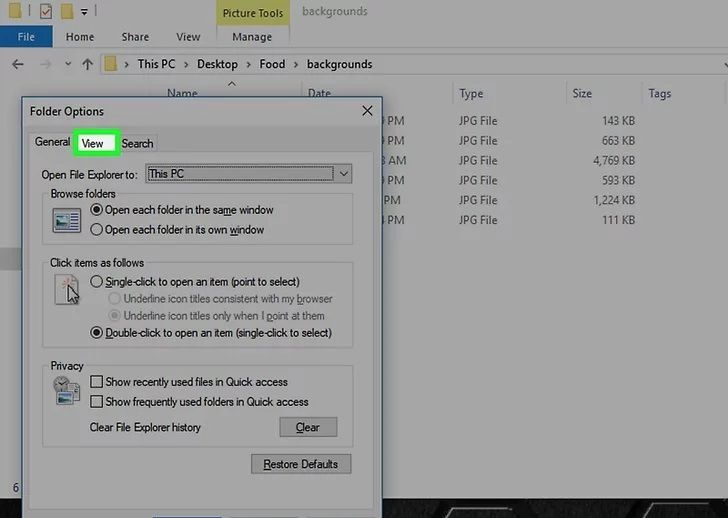
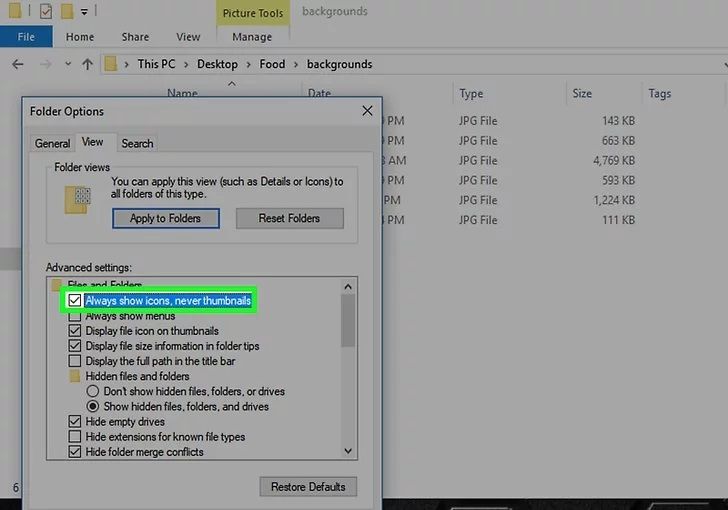
Step-2: Uncheck the "Always testify icons, never thumbnails" from the view tab of folder options.
Step-3: Now, click on the OK button.
By clicking on the Ok button, you lot've restored the thumbnail images for your pictures, media, and all other file types.
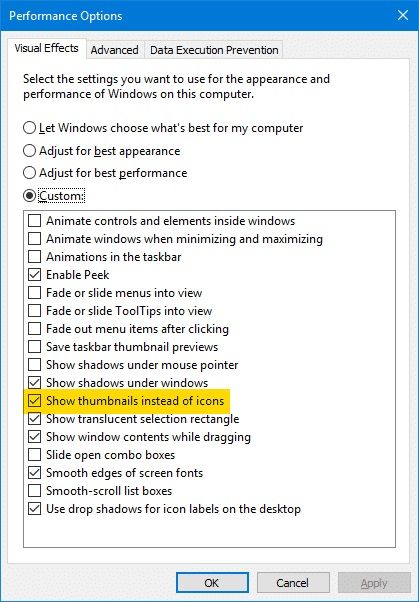
Enable Picture Thumbnails in Control Panel
Footstep ane: Open your PC'southward control panel and view the items in the big icons.
Step 2: Now, click on the system and Advanced system settings.
Step 3: In the Advanced tab, click settings under the functioning department.
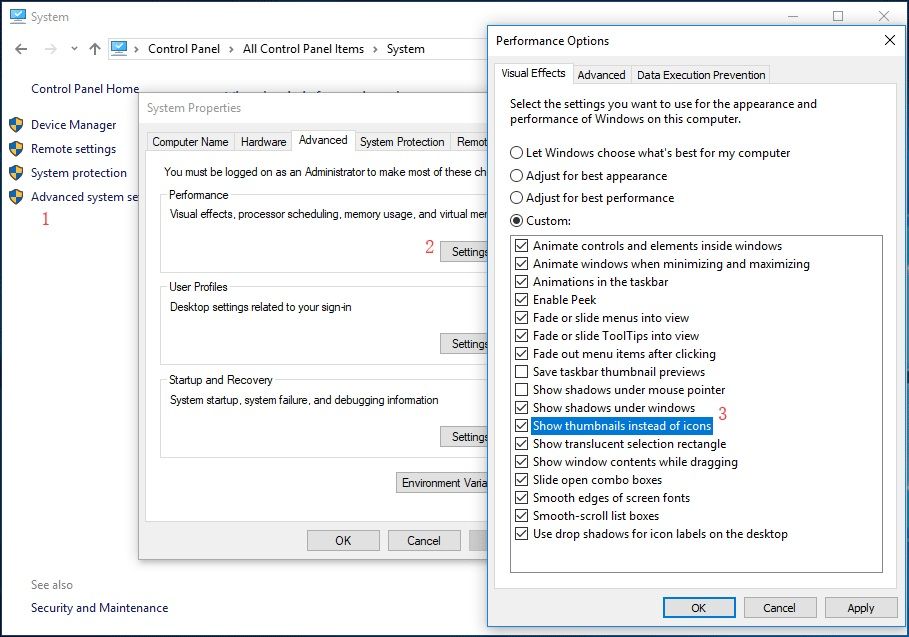
Step 4: At this point make sure that 'Show thumbnails instead of icons' is checked.
Restore File Explorer Options to Default
Pace-1: Open up File Explorer. Click on the View tab.
Step-2: Click on the Options push.

Step-3: Click on the View tab and so tap on the Reset Folders push.
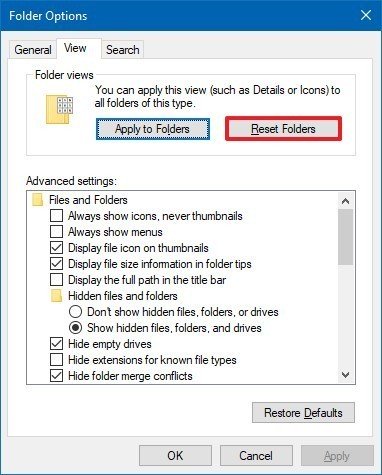
Stride-4: Click the Yes push and and then OK.
Once you're washed with the above-given steps the folder will reset to the default template settings. And your thumbnails will become enabled to your system's interface automatically.
Enable thumbnails enshroud with disk cleanup
Pace-1: Open the search box past tapping the Window push button and tap disk cleanup. Then select the deejay cleanup application to get-go the procedure.

Step-2: A drive dialogue box will open in forepart of you. Select your operating system bulldoze (typically drive-C) so click on the OK button.

Step-iii: At present select the disk-cleanup tab. Under the 'files to delete' coil menu check the Thumbnails option and uncheck all other options and then click OK.
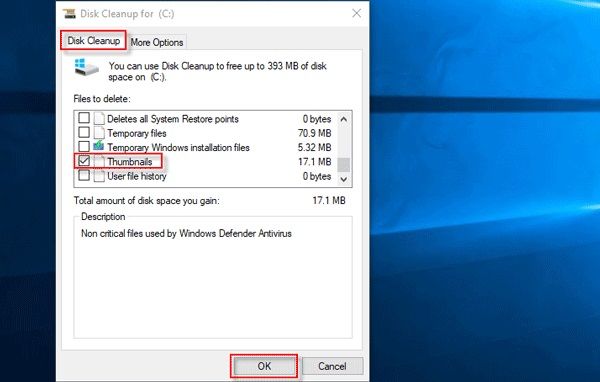
Step 4: Again, a dialogue box will pop-up click on the delete file pick to confirm that you permanently want to delete these thumbnails cache files.

Now your thumbnails cache is cleared successfully.
Run Browse Health to Articulate Thumbnail Cache
Step-1: First of all, you've to close all running programs and folders.
Footstep-2: And so open a Command Prompt window
Step-iii: Make sure to exit the Explorer shell
Step-4: To clear thumbnail cache to follow the below-given command,
del "%LocalAppData%\Microsoft\Windows\Explorer\thumbcache*.db" /a

If in case your Access is Denied so mayhap more than ane program is using the thumbnail cache database one or more than of the open programs are using the thumb cache database. Close all of them and try again the same procedure from safe mode.
Footstep-5: In one case yous're done with the above steps, open the Task Managing director (Taskmanager.exe) and Click on File → Run new task → explorer.exe → click OK.
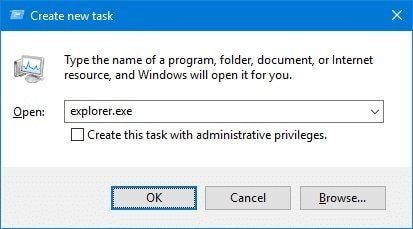
This process is the thumbnail feature for your all media, start menu, Taskbar, and the desktop, which is collectively chosen "Explorer shell".
Full Guide to Preview Pictures in Windows 10
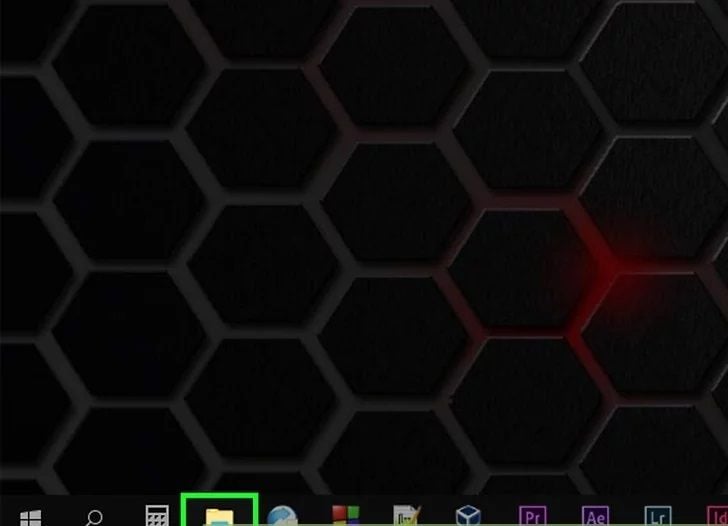
Step-ane: First open the file explorer (a folder-shaped File Explorer icon at the bottom of the desktop screen). If it is not present there then search it from the kickoff carte search box.
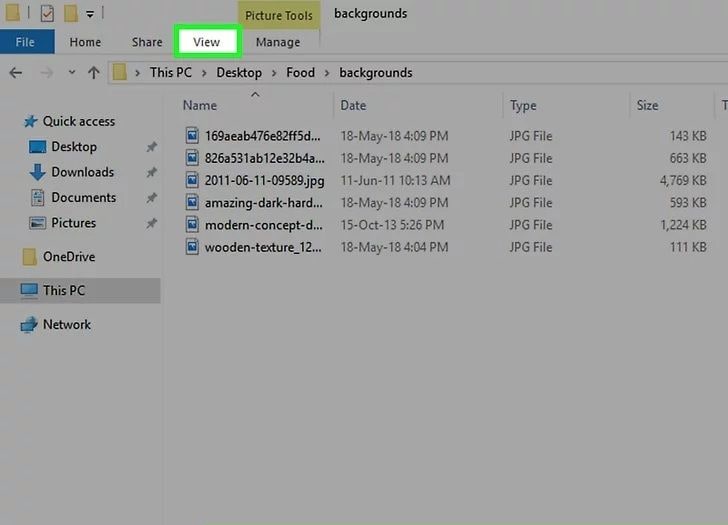
Step-two: Open up your folder by using the file explorer's left-hand column. Thereafter, navigate to the folder in which yous want to enable image previews.

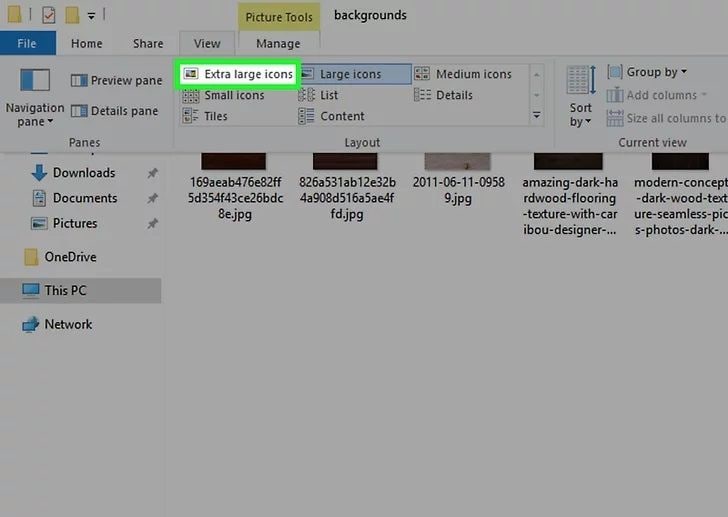
Step-iii: Now click the View tab placed on the upper-left side of the file explorer window. A toolbar volition drop-downwards in forepart of you.
Step-4: Thereafter click on the options icon placed on the upper-right corner of the window. You can resemble it through a white box having checkmarks on it. Clicking on it a pop-upward window will appear.
Step-5: Now click on the view tab placed at the pinnacle of the pop-up window.
Stride-6: Look for the files and binder section near the lesser of the window and right there uncheck the "always prove icons" option If you tin't see it and so showtime double-click the "files and folders" heading to get in announced downwards beneath it. After unchecking click on the apply button and so striking OK.
Footstep-7: After following the whole process make sure your folder is displaying the proper viewing option so that you can meet the thumbnails preview better. Yous tin can choose the preferred viewing format from pocket-sized/large/extra large accordingly.
Part iv: How to Prevent Windows ten Images Abuse or Loss
After studying the causes of Paradigm abuse and deletion, we are hither with prevention that you can practice which will ensure yous practise non fall in whatever unwanted situation. Considering "prevention is always better than cure".
Here you get preventive measures that you should study to avert 'windows ten image thumbnails not showing' issue.
Ensure, is your photo viewer compatible with your system:
Did you lot check that your photo viewer is with your estimator'southward configuration? Let'southward say you have an X64 CPU, then nearly probably your photo viewer would be unable to perform optimally because it is not uniform with the CPU. In that case cheque for the latest updates available for your photo viewer, install, and run it.
Take backup:
Taking regular backup of your data to iTunes or GDrive helps to do piece of work carelessly. You tin can download your important data anytime if it gets lost.
Insert/squirt your storage media properly:
It can exist observed that most of u.s. squirt the storage media carelessly. Always follow the proper procedure of insertion and ejection while using whatsoever USB bulldoze.
Let the reckoner terminate the job:
Don't be impulsive while downloading, sending, and uploading any image. Let the organization accept time to cease the procedure. If you interrupt in-between, information technology may corrupt your photos. Also, avert unplugging your ability supply directly from the socket.
If your organization is taking time to save or download or upload an image, and then give it time to cease the procedure. Do non interrupt the process in-between as this may corrupt your photos. Moreover, unplugging the power supply straight from the excursion should be avoided every bit well.
Ensure your system has a consistent ability supply:
The almost important but to the lowest degree focused cistron which leads to nearly 2/third of file corruption is the lack of power backups. Hence, e'er invest in a proficient power backup or UPS. If anything goes wrong with your power supply, you e'er accept actress power dorsum-up to avert whatsoever abrupt or sudden shutdown and image corruption.
Practice not work on the original files:
If you lot frequently have this upshot of the corrupted epitome then try to avert working on the original files. Instead of it, work on copies. Information technology is because, when you work on a copied version of the prototype then if unfortunately, anything once more goes wrong, your original photos are safety and untouched. You tin can start over again with some other copy version and save it when you lot're done.
Tin can not open PNG files on Windows 10? Come here to detect out tested solutions to gear up PNG can't be opened.
Closing Words
Since 2018 Windows x updates have given chance to the technical critics to earn some more bucks. But we believe that every technical aspect needs to ameliorate. That's why they offer updates. And for every trouble, there is a solution. And we hope that our slice has helped you lot to solve your thumbnail feature outcome in windows 10. For more technical guidance stay continued with us.
Source: https://recoverit.wondershare.com/photo-recovery/picture-thumbnails-not-showing-windows.html
0 Response to "Windows 10 Thumbnails Do Not Open When Making a Selection for Uploading a File"
Postar um comentário